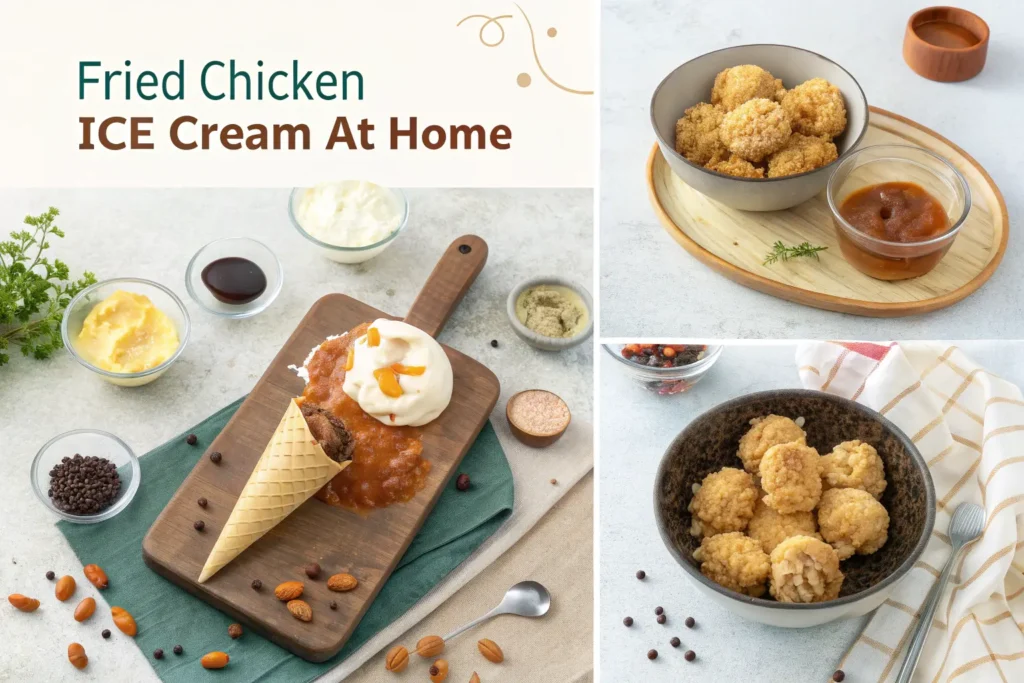
How to Make Fried Chicken Ice Cream at Home: The Ultimate Sweet and Savory Dessert Guide
Picture yourself standing in front of your freezer, holding a spoon loaded with something extraordinary. The creamy vanilla base melts on your tongue while crispy bits of seasoned chicken skin provide an unexpected crunch. Your taste buds dance between sweet and savory, creating a sensory experience that defies conventional dessert logic. This magical moment happened to me during a culinary adventure in Nashville, where a local ice cream artisan introduced me to fried chicken ice cream. That single bite transformed my understanding of frozen desserts forever, and today, you’ll master the art of creating this remarkable treat in your own kitchen.
Table of contents
What Makes Fried Chicken Ice Cream So Special?
The beauty of fried chicken ice cream lies in its bold contradiction. While traditional frozen desserts rely solely on sweetness, this innovative creation embraces the harmony between opposing flavors. The concept emerged from adventurous chefs who recognized that our palates crave complexity, not just sugar overload.
Your journey into savory ice cream territory connects you with a growing movement of culinary rebels who refuse to accept dessert boundaries. Celebrity chefs across America have embraced this trend, with establishments in major cities featuring variations that incorporate bacon, herbs, and even cheese into their frozen creations.
The science behind this flavor combination reveals why your brain finds it so satisfying. Sweet and salty elements activate different taste receptors simultaneously, creating a more intense and memorable eating experience. The textural contrast between smooth ice cream and crispy chicken pieces engages your sense of touch, making each spoonful an adventure.
Essential Ingredients for Your Homemade Creation
Success in crafting fried chicken ice cream depends heavily on selecting quality ingredients. Your foundation begins with a rich custard base that can support the bold flavors you’ll introduce.
Ice Cream Base Components
| Ingredient | Quantity | Purpose |
|---|---|---|
| Heavy cream | 2 cups | Creates luxurious texture |
| Whole milk | 1 cup | Balances richness |
| Egg yolks | 6 large | Provides custard structure |
| Granulated sugar | ¾ cup | Sweetness and texture |
| Pure vanilla extract | 2 teaspoons | Base flavor enhancement |
| Sea salt | ½ teaspoon | Flavor amplification |
Chicken Elements
| Component | Amount | Notes |
|---|---|---|
| Chicken skin | 4-5 pieces | From thighs for best flavor |
| Buttermilk | 1 cup | Creates authentic Southern taste |
| All-purpose flour | 1 cup | Coating foundation |
| Cayenne pepper | ½ teaspoon | Adjustable heat level |
| Smoked paprika | 1 teaspoon | Color and depth |
| Garlic powder | ½ teaspoon | Savory enhancement |
Your ingredient selection directly impacts the final product’s quality. Invest in farm-fresh eggs and high-fat dairy products for the creamiest texture. Source chicken skin from your local butcher, as grocery store options often lack the fat content necessary for proper crisping.
Step-by-Step Guide to Fried Chicken Ice Cream Mastery
Phase One: Preparing Your Chicken Components
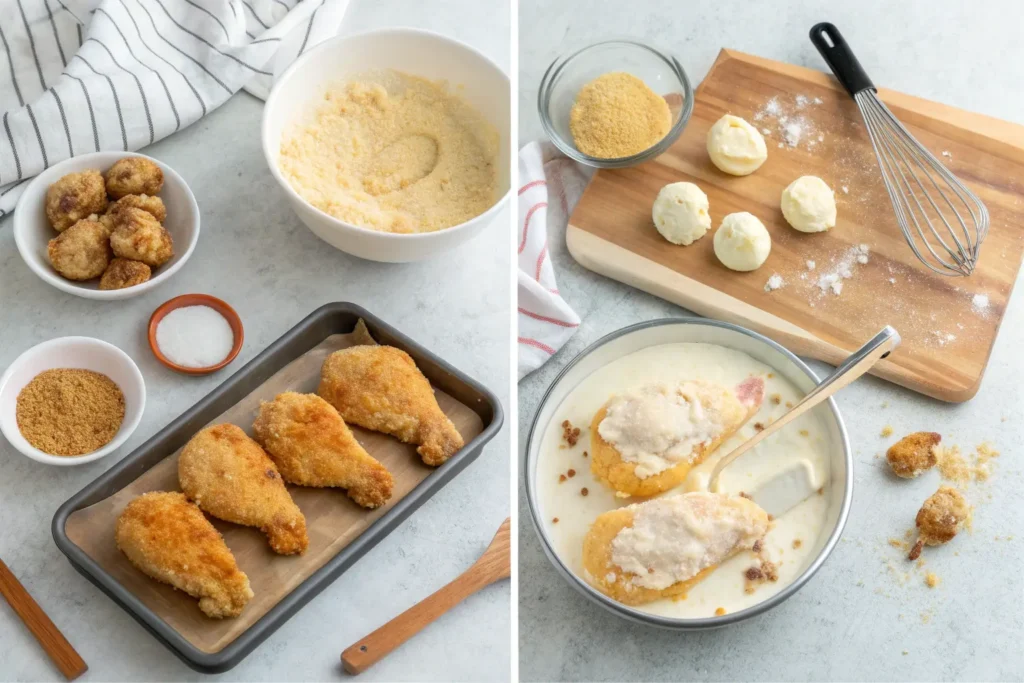
Begin your culinary adventure by focusing on the star ingredient. Clean your chicken skin thoroughly under cold running water, removing any remaining meat or cartilage. Pat each piece completely dry using paper towels, as moisture prevents proper crisping during the frying process.
Submerge the cleaned skin in buttermilk, ensuring complete coverage. This marination process requires patience – allow at least one hour for the tangy buttermilk to penetrate and tenderize the skin. Professional chefs often extend this step overnight for maximum flavor development.
While your chicken marinates, prepare your seasoned flour mixture. Combine all dry ingredients in a shallow dish, whisking thoroughly to distribute spices evenly. Taste your mixture and adjust seasoning according to your heat preference. Remember, you can always add more spice, but removing excess proves impossible.
Heat your frying oil to precisely 350°F (175°C). Temperature accuracy determines whether you achieve golden perfection or soggy disappointment. Remove each piece of skin from the buttermilk, allowing excess liquid to drain before dredging through your seasoned flour.
Carefully lower coated skin into the hot oil, avoiding overcrowding which reduces temperature and creates uneven cooking. Fry for 3-4 minutes until each piece reaches a beautiful golden-brown color. Transfer immediately to a wire cooling rack, resisting the temptation to drain on paper towels which can soften your perfectly crispy coating.
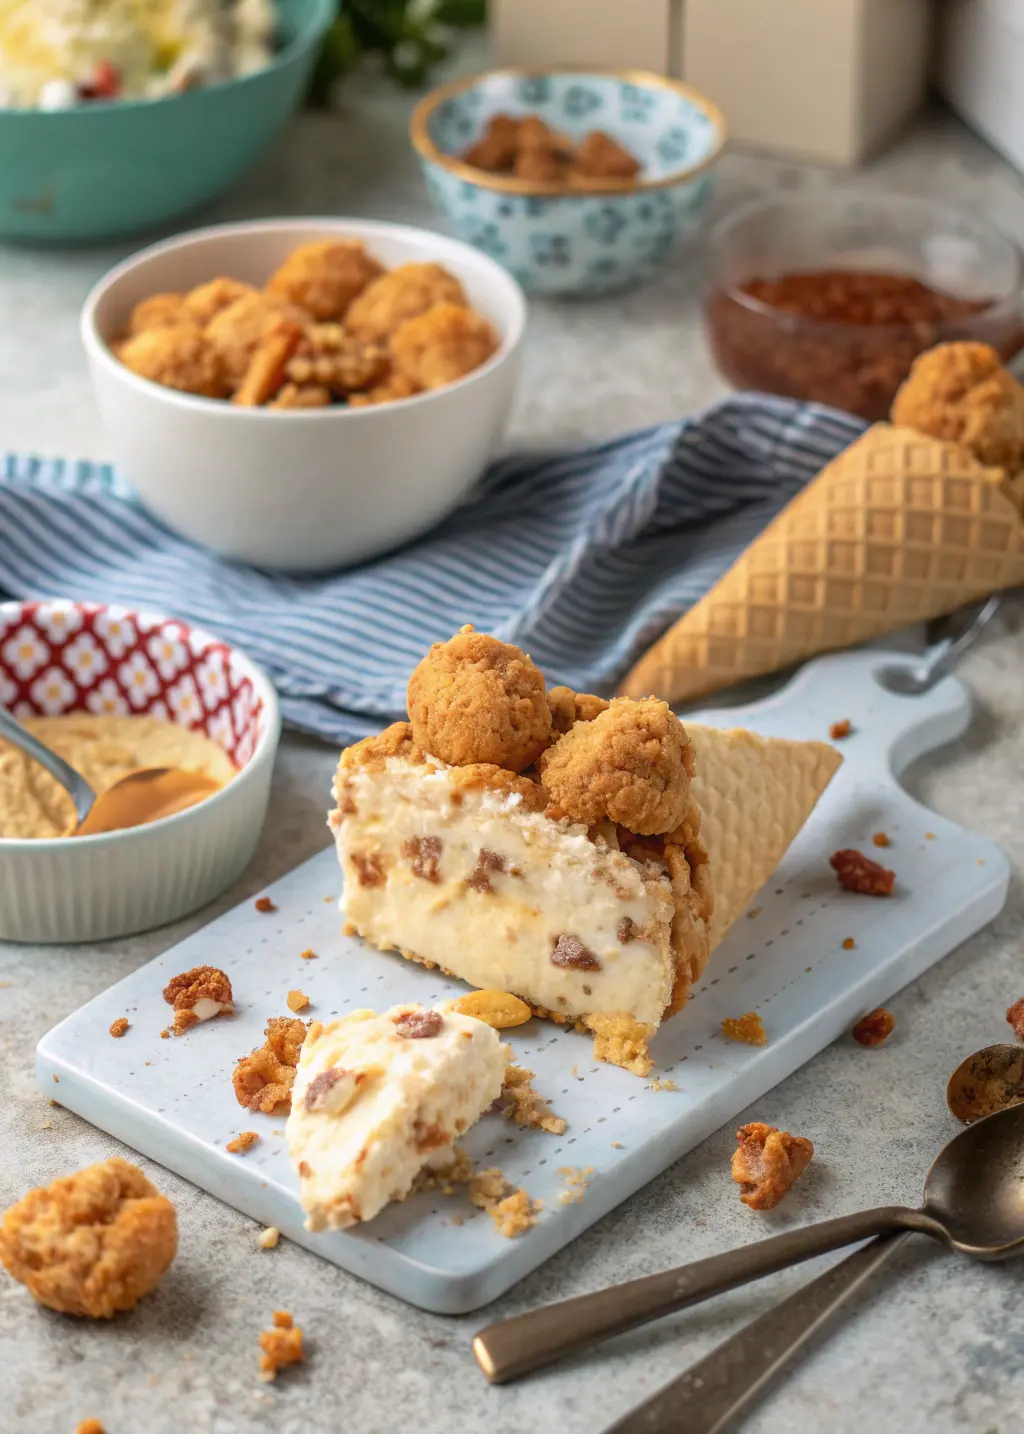
Once completely cooled, break larger pieces into bite-sized fragments while reserving some bigger chunks for final garnish. Pulse smaller pieces briefly in a food processor, creating varied textures that will distribute throughout your ice cream base.
Phase Two: Crafting Your Custard Foundation
Your ice cream base requires careful attention to temperature control and timing. Heat milk and cream in a heavy-bottomed saucepan to 170°F (77°C), stirring occasionally to prevent scorching. While your dairy mixture warms, whisk egg yolks with sugar until the mixture becomes pale yellow and slightly thickened.
The tempering process demands your complete focus. Slowly pour about one cup of hot milk mixture into your egg yolks while whisking constantly. This gradual temperature increase prevents your eggs from scrambling. Continue adding hot liquid slowly until you’ve incorporated about half the mixture.
Return your tempered eggs to the saucepan and cook over medium-low heat, stirring constantly with a wooden spoon. Your custard reaches proper consistency when it coats the back of your spoon and registers 175°F (79°C) on your thermometer.
Now comes the flavor infusion magic. Add your processed chicken skin pieces to the hot custard, stirring gently to distribute evenly. Allow this mixture to steep for 30 minutes, letting the savory chicken flavors permeate your sweet base. Taste periodically, adjusting the steeping time based on your desired intensity level.
Strain your infused custard through a fine-mesh strainer, pressing solids gently to extract maximum flavor while removing any unwanted particles. Stir in vanilla extract and salt, tasting to ensure proper balance between sweet and savory elements.
Phase Three: Churning and Final Assembly
Cool your custard base rapidly using an ice bath, then refrigerate for at least four hours or overnight. This chilling period allows flavors to meld while ensuring optimal churning conditions.
Churn your mixture according to your ice cream maker’s specific instructions. Most machines require 20-25 minutes to achieve proper consistency. During the final two minutes of churning, add your reserved larger chicken pieces, allowing them to distribute evenly without breaking down completely.
Transfer your finished ice cream to an airtight container, pressing plastic wrap directly onto the surface to prevent ice crystal formation. Freeze for minimum two hours before serving, though overnight storage develops even better flavor integration.
Pro Tips for Perfect Results
Your success depends on mastering several critical techniques. Balance represents the most crucial element – start with less chicken flavor and gradually increase until you achieve your preferred intensity. Remember that freezing dulls flavors slightly, so your base should taste slightly stronger than your desired final product.
Texture optimization requires strategic thinking. Maintain various sizes of chicken pieces to create interesting textural surprises throughout each serving. Avoid over-processing your fried elements, as completely smooth integration eliminates the delightful contrast that makes this dessert special.
Temperature control throughout every step ensures professional results. Rush neither the custard cooking process nor the final freezing phase. Your patience rewards you with silky smooth texture and perfectly balanced flavors.
Creative Serving Suggestions
Elevate your fried chicken ice cream presentation with thoughtful accompaniments. Serve small portions in chilled bowls, garnishing with additional crispy chicken pieces and a light drizzle of high-quality honey. Mini buttermilk biscuits make excellent vessels for creating unique ice cream sandwiches.
Consider seasonal variations that highlight different flavor profiles. Summer presentations benefit from fresh herb garnishes like thyme or rosemary. Winter servings gain warmth from cinnamon or nutmeg additions. Each season offers opportunities to reinvent this remarkable dessert.
Storage and Safety Guidelines
Proper storage extends your creation’s life while maintaining quality. Use airtight containers designed for freezer storage, ensuring no air gaps that encourage ice crystal formation. Your homemade fried chicken ice cream maintains optimal quality for two to three months when stored correctly.
Food safety requires attention to detail throughout preparation. Handle chicken components with care, using separate cutting boards and utensils to prevent cross-contamination. Cook your custard base to proper temperature, and maintain cold storage temperatures consistently.

Frequently Asked Questions About Fried Chicken Ice Cream
What does fried chicken ice cream actually taste like? Your first spoonful delivers creamy vanilla sweetness followed by savory, slightly salty notes from the chicken skin. The combination creates a complex flavor profile that balances familiar comfort food tastes in an unexpected frozen format.
Can I make this without specialized ice cream equipment? Yes, you can create fried chicken ice cream using the freeze-and-stir method. Pour your chilled custard into a shallow container and freeze, stirring vigorously every 30 minutes for 3-4 hours until you achieve the desired consistency.
How long does homemade fried chicken ice cream stay fresh? Properly stored fried chicken ice cream maintains peak quality for 2-3 months in your freezer. Always use airtight containers and consume within this timeframe for the best taste and texture experience.
Your culinary adventure into fried chicken ice cream territory opens doors to endless creative possibilities. This unique dessert challenges conventional thinking while delivering an unforgettable taste experience that will leave your guests talking long after the last spoonful disappears.
Ready to revolutionize your dessert game? Gather your ingredients, fire up your ice cream maker, and prepare to create something truly extraordinary. Share your fried chicken ice cream creations on social media and tag fellow food adventurers – your bold culinary choices might just inspire the next dessert revolution in your community!
Have you given our recipe a try?
There are no reviews yet. Be the first one to write one.